
Page 47 - Viva ICSE Computer Studies 5 : E-book
P. 47
• Click on the Date & Time button in the Insert group on the Design tab. You will see the Date and
Time dialog box. Select the desired date and format. Click on the OK button.
• Now, click on the Footer button on the Insert tab and select the Edit Footer option. You will see
the cursor on the left side of the Footer section.
• On pressing the Tab key, the cursor shifts to the centre of the page. The cursor shifts to the right
side on pressing the Tab key twice.
• Click on the Page Number button in the Header & Footer group on the Design tab. Select the
desired format from the drop-down list.
• Select the Format Page Numbers option from the drop-down menu to apply specifi c page
number style.
• You will see Page Number Format dialog box. Adjust the settings as required and click on the
OK button.
• Click on the Close Header and Footer button to close the Header & Footer Tools tab.
Inserting Column and Column Break
By default, the text is typed in single column in Word 2016. However, the application
software also allows the user to type text in two or more columns. Let’s learn how this
is done.
Using Column Button
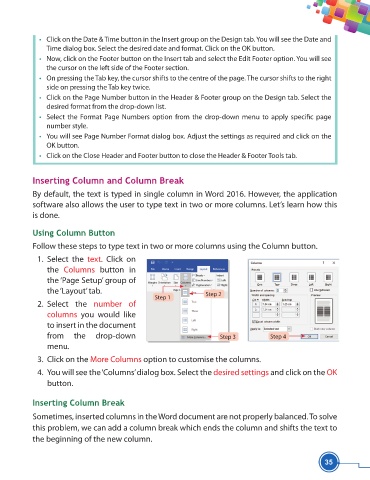
Follow these steps to type text in two or more columns using the Column button.
1. Select the text. Click on
the Columns button in
the ‘Page Setup’ group of
the ‘Layout’ tab. Step 2
Step 1
2. Select the number of
columns you would like
to insert in the document
from the drop-down Step 3 Step 4
menu.
3. Click on the More Columns option to customise the columns.
4. You will see the ‘Columns’ dialog box. Select the desired settings and click on the OK
button.
Inserting Column Break
Sometimes, inserted columns in the Word document are not properly balanced. To solve
this problem, we can add a column break which ends the column and shifts the text to
the beginning of the new column.
35